A visual guide for troubleshooting using scientific method
Introduction
Troubleshooting is an art form, part empirical, part handmade. The truth is, every sysadmin must evolve, for better or worse. Typically, a sysadmin learns to troubleshoot after enduring much pain, often staying up all night in a war room, dealing with an irate customer on the line yelling because the system is down, or perhaps after a catastrophic deployment in production on Friday at 6:00 PM. All these experiences contribute to their growth. But as the old saying goes, “A smart person learns from their problems; a wise person learns from others’ problems.” This is where the scientific method comes in. Is there a workflow that can systematize a troubleshooting approach? The good news is, yes, there is.

What is the Scientific Method?
When direct experimentation is not possible, such as performing a full health check-up on a 4,000-year-old mummy, scientists need to adapt the scientific method. Even with adaptations, the goal remains the same: to discover correlations between cause and effect, ask good questions, collect evidence, and see if all available information can lead to a logical answer.
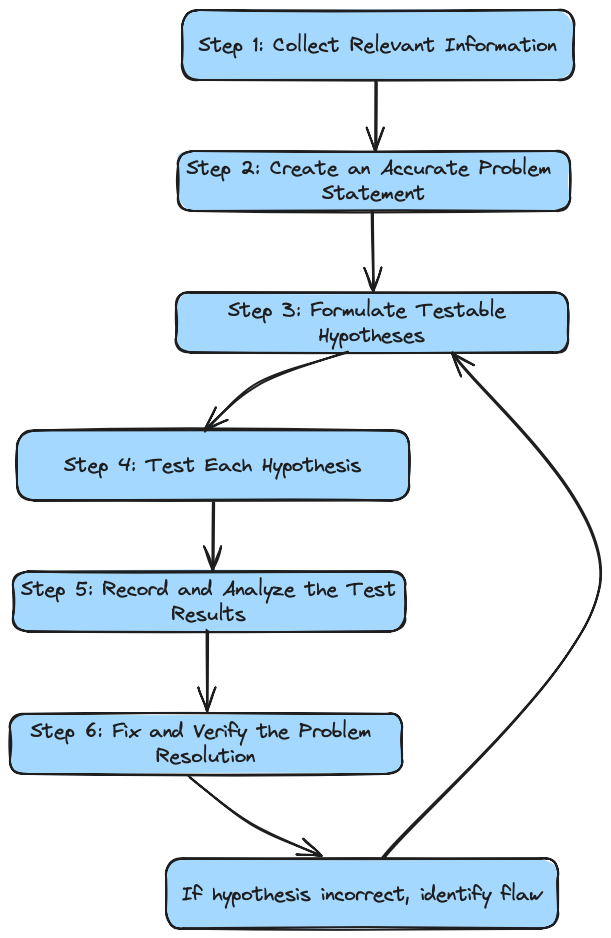
Here’s a diagram about the scientific method workflow:
And What About Troubleshooting?
Troubleshooting is the process of identifying an issue, collecting information about it, analyzing it, and resolving it. From simple problems to huge, seemingly unsolvable ones, the mechanics behind a systematic approach to solving problems with scientific methods are the same. And it’s quite simple. A common mistake during empirical troubleshooting is to focus 100% on the problem until it’s solved. This is a hidden trap; inevitably, the same error will reappear to haunt you.
Using the Scientific Method
In many scenarios, you might execute the scientific method in its entirety or adapt it to your needs, like so:
Steps
Step 1: Collect Relevant Information
First, collecting information about the problem usually starts by asking the person who reported the problem or checking logs, tracing, or metrics in observability tools for more details about the issue. This step is akin to detective work: investigating facts, looking for clues, observing the environment, and collecting any relevant data. Remember, every system will eventually fail, so try to avoid bias or personal opinions during this phase. This step concludes when you have a clear understanding of the problem and can reproduce it.
Step 2: Create an Accurate Problem Statement
This process uses cognitive capacity to articulate the problem clearly. When you can describe the problem in detail and explain it, the issue becomes crystal clear in your mind, and you’re ready to move forward. Questions to ask might include: What service, application, API, or function is failing? How do I reproduce the issue? When did the problem start? Were there any changes to the environment before the problem appeared? Are multiple systems failing? Is there a correlation?
Step 3: Formulate Testable Hypotheses
With the information gathered, you likely have some ideas on how to fix the problem. Hold on. Like Dr. Strange in the Avengers, a good troubleshooter is an expert at formulating all possible, practical hypotheses about the cause of the problem and making notes on each. List each hypothesis and the steps necessary to test them. Articulating all hypotheses and related steps clarifies the problem as a whole.
Step 4: Test Each Hypothesis
This step involves practically performing the tests you’ve outlined for your hypotheses. Organize your hypotheses in a way that suits your case. The result of this validation will either validate or refute hypotheses from your list. It’s common to favor some hypotheses, but if they’re refuted, forget them. Avoid converging or mixing hypotheses at this stage. If a new hypothesis arises, write it down, add it to the list, and do not alter any previous steps during testing. Remember to take note of all processes, like parameters, steps, behaviors, and any new or unnoticed relevant information.
Step 5: Record and Analyze the Test Results
In the previous steps, some data was recorded, such as validated hypotheses, steps to reproduce them, and related information. If any new relevant information emerges during this process, it’s good practice to add it at this step. This information is useful for automating the solution process later using DevOps techniques and, more importantly, for producing documentation about why the problem occurred and what was done to fix it. Generally, the result is a document like an RCA (Root Cause Analysis) or a Postmortem. Step 6: Fix and Verify the Problem Resolution Usually, a temporary fix is required to restore the system’s normal behavior. It’s highly recommended to apply the fix exactly as written in the previous steps. This verifies once more that the described process works, building confidence and producing evidence for a permanent fix later, during a maintenance window. If you can successfully perform a permanent fix using the documentation produced following these steps, you’ve solved a problem using the scientific method. If the hypothesis turns out to be incorrect, it’s necessary to identify the flaw. This might lead to the formation of a new hypothesis about the original one.
Conclusion
Of course, there are many improvements that can be applied to a typical Dockerfile, but using a multistage approach is an excellent pattern for production. With this method, we don’t need to worry about build dependencies or any additional resources for building container images. Everything is contained within the Dockerfile, making it highly repeatable in a CI/CD workflow.
Any sugests or doubt?
Feel free to reach out to me on social media: twitter ,linkedin and github.
You can also email me directly at rmnobarra@gmail.com.
Support
Did you really enjoy my content? Consider buying me a coffee through my Bitcoins wallets:
Bitcoin Wallet:
bc1quuv5hml9fjkf7azgwkt4xp867pzdwzyga33qmj

Lighting Address:
lnbc1pjue6mkpp5yj737e7fm6efhlj6sns42a875pmkencqmvdshf4ghlnntaet5llsdqqcqzzsxqrrsssp5d9hxl686w839qkwmkm0m30cf5gp4gnzxh68kss393xqzlsg0wr3q9qyyssqp3933zc3fg46nk3vafh63r3lqd0jn2p04w5xrz77h33rrr3xm7ckegg6s2ss64g4rf4jg87zdjzkl5tup7umqpghy2qnk65tqzsnplcpwv6z4c

Bye!